Fabrication 101: The Anatomy of a Chicken

For most of us, A chicken has been broken down into several familiar cuts such as the Chicken Nuggets, Chicken Strips, and Popcorn Chicken before we ever see the bird as a whole. Even the Chicken Basket at your Local KFC can be puzzling to try and piece together. Remember one thing when deciding how to regiment your diet: Eat Fresh – Eat Local! If you want to eat healthy, cleanse your body of all the Chemicals and Hormones that are put in your food (in order to create a consistent shelf stable product) then get involved in your local Food Scene. Farmers Markets, Local Gardeners and Butchers are readily available to anyone who takes the time to look. And in most cases, their chickens have not been frozen for weeks before seeing the shelf.

Now having said my piece; There is no other source of protein that I love working with more than Chicken! I love the endless possibilities the bird offers and the taste of those succulent thighs; enough to keep me coming back long after I have satisfied my fowl appetite. In my opinion, everyone should rightfully know how to properly dismantle this beast.
Step 1 : Remove Collar Bone

Located at the neck of the bird (imbedded between the two breasts) is the Familiar “Wish Bone” Locate and (using a sharp knife), scrape the tip of your blade against the breast near the neck, until the bone becomes visible, then carefully cut it out. Dry it out and let the Kids Make wishes, every child becomes ecstatic in seeing a “Wish Bone”
Step 2 : Remove the Wings

Place the blade of your knife, directly in the center of the joint that connects the wing to the birds abdomen. If you are directly on the joint you should sever the limb with ease, no resistance . Repeat on the other side of the bird, 2 wings = 2 cuts

Step 3 : Remove the Thigh & Leg

Now this can be done all at once: Make a cut piercing the skin in the crevice between the leg and Breast. After cutting the skin, you will see that you can naturally pull the leg back away from the abdomen then pop the bone out of socket.

Now place the tip of your knife between the exposed joint and cut toward the tail following the backbone, this will leave you with an entire hind quarter, to separate the thigh and leg, place your knife on the joint where the two pieces connect and sever the leg giving you the two pieces. Repeat on the other side of the bird, 2 legs + 2 thighs = 4 cuts
Step 4 : Remove the Breasts

Down the center of the two breasts, runs a piece of cartilage anchoring the flesh to the carcasses. One deep incision running the length of the corpse following close to that breast plate as a guide, once you hit the rib cage, slightly turn your knife and follow the path of the ribs, paying attention not to cut into the breast.
2 breast = 2 cuts

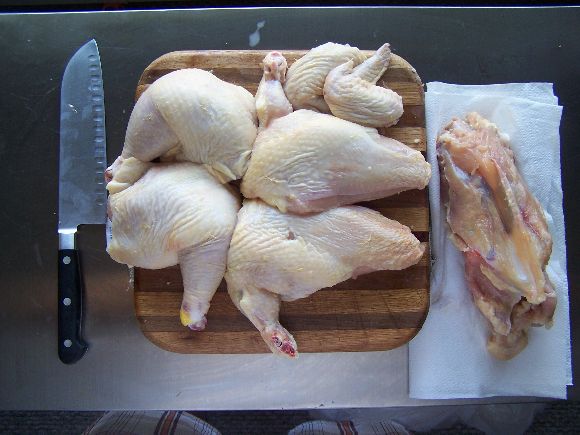
You should be left with an inventory of the Following: 2 legs, 2 thighs, 2 breasts, 2 wings, 1 neck, and a carcass. Now the neck and carcass are to go into the freezer for a future Stock, Article to come soon.

Now this was a very quick and photogenic tutorial and as you practice and learn more of butchering this bird, you will pick up hints and tips along the way. Such as: Frenching the Wings (for presentation, of course), removing the Thighs in a way that insures you get the “Oyster” (A small muscle between the thigh and the backbone; often thought to be the best, most succulent piece of the Chicken) and of course your speed!
When Butchering in a professional Kitchen there are two qualities that will define your Skill Level. Speed and Consistency. Quickly butchering 50 chickens, with each piece seemingly perfect; that is your only goal. Quick and perfect, Enjoy your practice. Plus, the great thing about the Anatomy of a Chicken is they make all birds the same out there in the world, if you know how to butcher a chicken you will do fine with a Duck, a Pheasant, Turkey, Squab and so on.
Click here for a great Brine recipe, and you are well on your way to a Fantastic Feast